How to translate using Language Manager
Language Manager is a free utility that allows you to create and translate the language files for your application. You can start it from <Localizer installation folder>\localizer\langmngr\langmngr.exe
The native language file that has been created when you <localized your project first time> serves as a project file for Language Manager. Open it using “File | Open project…” menu item or start Language Manager from IDE (“Localizer | Run Language Manager” menu item) to get the project opened automatically.
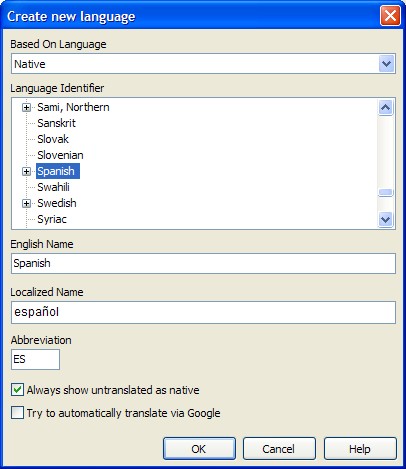
First, you have to create some language you need to translate to. Select “File | Create New Language…” menu item. In the appeared dialog select the desired language from “Language Identifier” list and press OK (see Language Manager’s help file for other options details). The new language is created and is displayed in Language Manager as new grid column.
Next time you open the project in Language Manager the created language will be opened automatically.
When the project is opened you see a grid that allows you to translate your language files. Each column but the fixed one corresponds to one language. You may change the order of columns by dragging and dropping them. Fixed (the most left) column contains properties / constants names.
The grid filled with properties/constants values is the main field of action of a translator. Each column of the grid represents the language file to be translated. Each row represents the property or the constant to be translated.
To translate some cell select it and start typing. Current cell value will be replaced with the text you are typing.
You can also press F2 on the keyboard to put the cell to “edit” mode. In this case the text will not be replaced.
The blue triangle in the cell right bottom corner indicates that its content was not translated yet (or its version is out-of-date). The state is changed to “translated” when you edit the cell.
The special mark * put on the right side of the column caption means that the language has been modified (some cells have changed their values). You can (and you periodically need) save changes using “File | Save Language” menu item or by pressing Ctrl+S.

